Thursday, August 2, 2012

THE MOVING WALL

Moving Wall Brochure

The Moving Wall visited VFW post 1863, Solon, OH, this weekend, July 26th - 29th. It was erected at a long 90 degree angle along the VFW parking lot just down the street from where I worked. I drove to the wall expecting maybe three-foot slabs of two-inch-thick stone standing four feet high to be engraved with names. But the wall was constructed of black-painted sheet metal sections with white screen-printed names in a serif font. I’m not sure what I was expecting; I could not have expected anyone to practically move granite slabs all over the U.S.
The Moving Wall casted a solemn mood, even on a sunny Friday afternoon. The list of names were pennant in shape, beginning with one single name from left (the last soldier), then two listed atop one another, then three listed, four, five, six..... The 90 degree corner was the crux with “1959” describing the descending order from inside out, beginning with the first soldier taken. Volunteers read names alphabetically through a P.A. system in the middle of the parking lot, struggling to get through the Jones and Johnsons while I was there. I think it would have been more natural to read them in order of the wall. Nevertheless, the readings brought a black shroud of remembrance on a sun-shot day typically basked in a haze of forgetfulness as the weekend began.
The Moving Wall
I didn’t really know anyone who served in Vietnam---no family, at least. Many, as we know, were drafted from city streets and wheat fields, classrooms and workshops, and deployed in vine-twisted jungles. Ike said, “American boys can’t fight in jungles.” And I think people know (philosophically) well the ground that they toil. My dad graduated from Wynford High School out in the Ohio wheat fields in 1974. The last drawing date of the draft in 1975 was August, 19---his birthday 19 years earlier. 19 was a colossal number for him---he passed away on June, 19. 
The names on the wall, I know none and are long gone. JOHN R WILLIAMS might as well have been the guy down the street. I saw my best friend’s dad through the white-serif capital lettering, yelling at us to keep it down because it was 2:00 P.M. and he had to work the conveyor line that night. But life is like the Moving Wall: black, solemn, gone, and full of names. And it keeps moving, giving some more life to the solemn, dead, gone.

Monday, July 16, 2012

CAMP COFFEE


Coleman aluminum percolator
Making coffee from scratch at camp is not as difficult as it seems. The hardest part is getting water to boil, so I use a white gas Coleman pump stove (I found one through Craigslist in someone’s basement for $40). I also use a Coleman aluminum percolator that you can get at any department store. Here’s how I do it:

1.    Water-fill the percolator to the full line or desired amount. I use bottled water instead of the campground spigot.
2.    Place a coffee paper filter into the basket by poking a hole in the center with the percolator stem.
3.    Fill the basket with coffee—the more the stronger. I fill it approximately ¾ full and it’s plenty black and strong.
4.    Place the basket on the stem and set the basket lid on top.
5.    Place the apparatus into the percolator and set the percolator lid on top.

Lighting a white gas Coleman pump stove is tricky but is a good way to boil water quickly outdoors. The first time I started up a Coleman stove, I was really unsure about it; so, here’s what I learned:
Coleman Stove

1.    Remove the red tank and generator assembly from storage position underneath the grill; do this by pulling up the right side and turning it towards you.
2.    Fill the red tank with white gas. Just about any sporting goods department sells white gas by the gallon. There’s a twist-off cap at opposite end the generator. Be sure replace it tightly as it will be place under pressure.
3.    Unlock the plunger by turning it counterclockwise a half turn, place your thumb over the hole on the knob, and pump the tank 35 to 50 times.
4.    Lock the plunger by turning it clockwise a half turn.
5.    Place the red tank and generator into the green stove: there are two hooks on the red tank that hang it from two slots in the front of the green stove; a hole in the stove leads the generator stem to the silver manifold.
6.    Turn the instant light stem up. Hold a struck match to the master burner while turning open its black-knobbed valve—it should light immediately; if not, turn off the valve and inspect the condition of the generator and its parts.
7.    Once lit, burn the oxygen out of the tank by turning the master burner high until all orange flame has evaporated into blue flame. Blue heat is desired.
8.    After long use, pressure in the red tank may go down. You can pump more pressure during operation. Be sure to hold the tank steady in your left hand while pumping with your right.

Once the water begins to boil in the peculator, the stem will begin to spout coffee in the glass knob on top. About 1 to 1½ minutes of spouting or brewing should be enough. Remove the peculator or turn off the stove. Caution: boiled coffee is much hotter than coffeemaker coffee. Once cooled to drinkability, camp-brewed coffee is very enjoyable outdoors. 

Saturday, July 7, 2012

CADE'S COVE


John Oliver Cabin
Cade’s Cove is home to ghostly homesteads on rolling, Cherokee-made prairies inside the mountains. The 14 mile loop road passes centenarian frontier houses, barns, churches, and a mill that anyone can walk through. The two-storey John Oliver cabin was the first to be hand-built in the cove and today has more "f**k yous" and so-and-so's family is #1 carved in the walls than perhaps the whole cove. A sign out front called “Bob was Here” tells the story of a man who was fined $100 for scratching his great, imbicilic initials into the pine. When I stepped into the cabin, I smelt a rustic,  old-timey smell that took me back to my elementary school where I was paddled for climbing railings and laughing at the punishment. I also had to write sentences. I was ten and Bob wasn't.

Cable Mill
Cable Mill is as adventurous as the day it was built by hand. First sign we read on the homestead warned us of snakes living underneath the boards of the historic structures. Just beyond the sign a small barn stood with a small serpent head popping out of the floorboards---the sign was no joke. The white house use to be a general store down the road and was purchased by a woman who owned the mill and farm. The inside is virtually unchanged with the exception of more graffiti wallpapering.
The slash-and-burn prairies were perhaps the best attraction. The clearing gave way to scenic pictures of the Smokies---dark blue and grey rocks above a green tree line and yellow fields below. The fields grew crops years ago but today they are a sea of tall grass, most likely periodically mowed by the National Park Service to retain its views and quaintness. Folks here and there lawn-chaired along the loop road. It was nice.

Even though the speed limit is 15 MPH on loop road you will be tailgated. Sight-seeing and sereneness demands a slower speed. The loop road is a well-paved, one-lane road frequented with spaces to pull aside for viewing and reducing traffic (side-spaces are common in the entire park). However, it is uncommon to see tires rapping the pavement in your mirrors. It takes about 45 minutes to get to Cade’s Cove and about two-three hours to drive and see the loop. The views were awesome. We weren’t in a hurry.


Cade's Cove


Tuesday, June 5, 2012

THE SKYLIFT


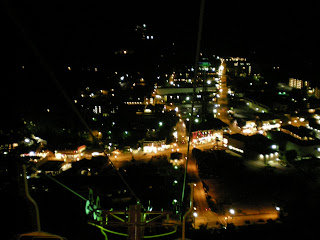
$13 will get you a ride to the top of Boyne mountain on the Gatlinbrug Skylift. Virtually unchanged since it opened in 1953, a single bar holds you in a yellow two-person bench seat hanging from a steel cable that pulls you up. So our feet dangled 20 feet from ground, stream, then mountainside before we realized that flip-flops are not ideal footwear. On the way up we passed a teenager mimicking a girlfriend underarm with kisses. I told him to quit screwing around when he replied,
         “What, can’t I have a pretend girlfriend? Yeah, I’ll remember you, seat 38, when you get back down!”
         He weighed about as much as my left leg. But it would be classic to say that I got in a fight at the Skylift.
Just before the top a mannequine hillbilly instructed us to smile for the camera so you can buy the shot at the top. At the top, from the bench seat, we were greeted by an attendant whom asks you politely to jeticent the bench seat to the gift shop on the right. Loaded with trinkets, souvenirs, pictures, tactical knives and weaponry, one can purchase a take-home memoir of the Skylift for the pocket for the ride back down.
The Gatlinburg city lights burned energy-saving orange just as any city would from 300 feet.
When our feet hit the ground with the help of our attendant, we felt the evening spring air and the Skylift worth the money and, unfortunately at $13 a ticket, someone else did too. When we left the gate I looked for the brat kid but he was nowhere to be found, except maybe up the street at the arcade, or the hill billy golf, or the air-soft pellet gun store, or irritating their parents. Gatlinburg closes at 9:00 P.M.

Wednesday, May 30, 2012

CLINGMAN'S DOME


And then we turned round, and saw the tops of clouds for the first time. They’re a grey wool-like fog that move ghostly around and through mountains and over the paved path we just walked. They’re cool and tasted of dew, smelt clean and fresh and new like that of another planet, like only 6,000 feet could. We looked out as far as the clouds let us, and weren’t unhappy where they didn’t.

Clingman’s Dome is a over a mile (6,643 feet) above sea level and over a sea of grey and green deciduous trees and conifers. Just before reaching this height, we crossed the Appalachian Trail where I picked a granite stone souvenir. The paved trail ends at an elevated, spiraled walkway that leads to a circled lookout platform---unchanged from the day it was made, constructed of brown- and tan-pebbled cement. Spruce-fir forest covers the mountains peaking and rolling through clouds panoramically, offering us sky views of Tennessee and North Carolina at cloud level. We took our time.

WATERFALLS


Waterfalls. Every thousand yards gushed a waterfall; brooks, falls, rapids, steep mountain sides sliding clear water towards the Mississippi. Water rushed over and around rocks---stones to gigantic boulders (smooth and round the old rocks, rigid and square the young). Tiered stone steps climbed up under and beside each falls, making it easy for novice hikers to get close. The cool mist must have been refreshing to the Cherokee or hiker before me who breathed hard up to see these falls.
The Laurel Falls is one of the Great Smoky Mountains’ most popular attractions. About a mile of well-travelled, slope-sided dirt path winds to the falls. Its condition reminded me of many high-traffic trails found in urban metro parks. Tree trunks and rocks were graffitied with initials, hearts, dates, and scratches of claiming rights to experiences--- articulations of unsophisticated and extroverted behavior, or some insecurity. Nevertheless, the falls rushed loud and fast when we reached a small wood bridge that crossed the fallen water. The temperature dropped when we walked up and we were hit again by mist. The falls fell at least a hundred tiered feet at twenty-five feet wide. You can climb some rocks down a ways to get a better shot. There were several hikers there one week before the high season began in May. Get there the earlier, the better.

Wednesday, May 23, 2012

BLACK BEARS


Some 1500 black bears live in the Smoky Mountains. We saw none. Some guy leaning on a barbed wire fence looking at wild horses at Cade’s Cove told us that a momma bear and cubs were sighted just around the bend; supposedly, when we got there, the ranger drove them off with a stick. A volunteer passerby on the Laurel Falls path warned us to be careful, that there’d been bear sightings all day. We saw crawling paths up and down cliffs, and even a fake paw print in the muda curled palm and four thumb prints—but no bears. I looked so hard I began to see bears: I took a large, dead black tree stump under a thicket of Rhododendrons to be a feeding male. Bears were sighted on the four-mile horseback trail according to our Wellington-booted, sleeveless Tennessee guide—but nothing. By the end of the week we began believe that warning out-of-towners of bear sightings was a running local joke, that it just couldn’t be helped, that they had to say itbecause it was so easy.

Tuesday, April 24, 2012

SPUR:

Here's an excerpt from "Two Tramps in Mud Time" by Robert Frost which hangs in my toolbox at home and work:

          “BUT YIELD who will to their separation,
           My object in living is to unite
           My avocation and my vocation
           As my two eyes make one in sight.
           Only where love and need are one,
           And the work is play for mortal stakes,
           Is the deed ever really done
           For Heaven and the future’s sakes.”

                                                           1936

CHANGING ENGINE OIL:


Drain plug
      Underneath every car or truck is a big fat bolt sticking out of an oil pan connected to the engine bottom. Take two combination wrenches consecutive in size and insert the ring of one into the open end of the other to create a torque bar. Flick the drain bolt off quickly and let the used oil pour into a pan. Have a rag handy.
Two-wrench torque bar
            While the oil pan is draining, go for the oil filter. These are sometimes right there, on the side of the engine, atop, behind the wheel well or inside the engine with a cap. Try turning the filter first by hand. If it won’t budge, use a band wrench or Jap tool. If you have neither or these, then jam a flathead sideways and perpandicularly through the filter and turn it off that way. Be ready: the filter will spew oil immediately after a half turn. Check and make sure the rubber gasket is intact on the filter and then dump them both into the pan. Wipe the mounting base. Dip your finger in some new oil and lube the gasket on the new filter. Screw it hand tight with a ¼ turn past resistance.
Standard oil filter
            By now the oil pan should be down to a trickle. Flush the engine by droppng a ½ quart new oil through. Wait five minutes or for a one second drip and put the drain plug back in—¼ tight again. Clean up. Add one quart less than the fill capacity listed in the owner’s manual and start the engine. Make sure the oil pressure gage needle goes up or the oil pressure light goes out, and then while the engine is still running check for leaks underneath. Also, check the transmission fluid. Stop the engine. Check the engine oil level and add whatever necessary. On most vehicles the marked area at the end of the dipstick represents a quart; some are divided and cross-hatched into halves and quarters. Replace oil fill cap and repeat in 3,000 miles.

CHANGING GUITAR STRINGS AND INTONATION:


CHANGING STRINGS

            Get a string winder. Pluck the low E with your right hand and unwind with your left and hear the tuning flatten to a metal rattle. At this point there should be enough unravelled string to pull it up and off the tunning nut, where you can unwind and pull the string out. Then pull the bottom end of the string by the eye out of the body. Repeat five times.
            Once the old strings are off, clean and polish the neck and body and everything with lemon oil. Inspect the nut bridge, frets and saddle bridge for wear. Tighten any loose screws.
            Start restringing with the low E: Send the bare end of the string through the back of the saddle bridge and then through the eye of the nut. Pinch the string with the left hand after placing the string in the nut bridge and pull the string with the right index finger about three inches from the body. Then grab the string at the nut bridge with the right hand and bend the string 90° around the tuning nut with the left hand. Start cranking the tuning nut while keeping tension on the string with the right hand at the nut bridge. Turn it all the way up to a low E, pass it sharp and back, exercising the string. Repeat five times.
            Tune the guitar, push and pull the strings on the fret board as you would play them, and tune again—exercising the strings now lessens tuning during play.

INTONATION

            There should be a slight concave curve in the neck. Look down the top of the neck from the bridge like a sighting a rifle to see if it curves. If you have a feeler calipers handy, 4/64” (1.6mm) is the standard distance between the 12th fret and the strings. Adjust to your playing style if need be.
            The 12th fret is one octave higher than open tuning. Intonation is the open note in tune with the 12th fret octave note. If sharp, turn the saddle screw counterclockwise, moving the saddle toward the neck. If flat, turn it clockwise. Repeat for all six then strum a chord high up on the neck. It shouldn’t wobble.  

TO BEGIN:

Welcome to my introspective blog on experiences and self-reliance. Here, I am posting stories and reviews of places that I’ve been and instructions on practical things I’ve been doing for a long time. The former will mostly be an exhibition of my writing on camping, hiking, fishing, and all things outdoors, while the latter will cover small, DIY electro-mechanical and carpentry projects such as changing guitar strings, motor oil, electronics restoration, and furniture. All my writings here will be an exposition of a compiled work which I intend to name The Bootstrap Field Guide.